(Part 2) Build quality forms with React 🚀
Optimize developer experience, ship with confidence

I have been making websites for more than ten years now, both professionally and for personnal projects, but always with passion and implication. I am fascinated by the evolution of technologies around web development, and I always try to stay up to date with the trending frameworks and libraries.
Photo by Kelly Sikkema
This article is the second and final part of "Build quality forms with React 🚀". In the first part, I explained what controlled and uncontrolled forms are in React, and I introduced two wonderful libraries: react-hook-form and yup.
Putting it all together
To demonstrate how it all ties up together, I will walk you through the process of building a simple yet solid login form. It will be made of two inputs (email and password), a checkbox "remember me" to keep the user session alive, and a submit button. We will also add a link at the bottom of the form, to switch to the registration form that I will also show you later.
We won't be implementing any real authentication, the goal here is to focus only on the form and its validation. However, I will use Bootstrap class utilities for styling, so you get a good idea of what a "real-life" form would look like code-wise. Here is what the form will look like:
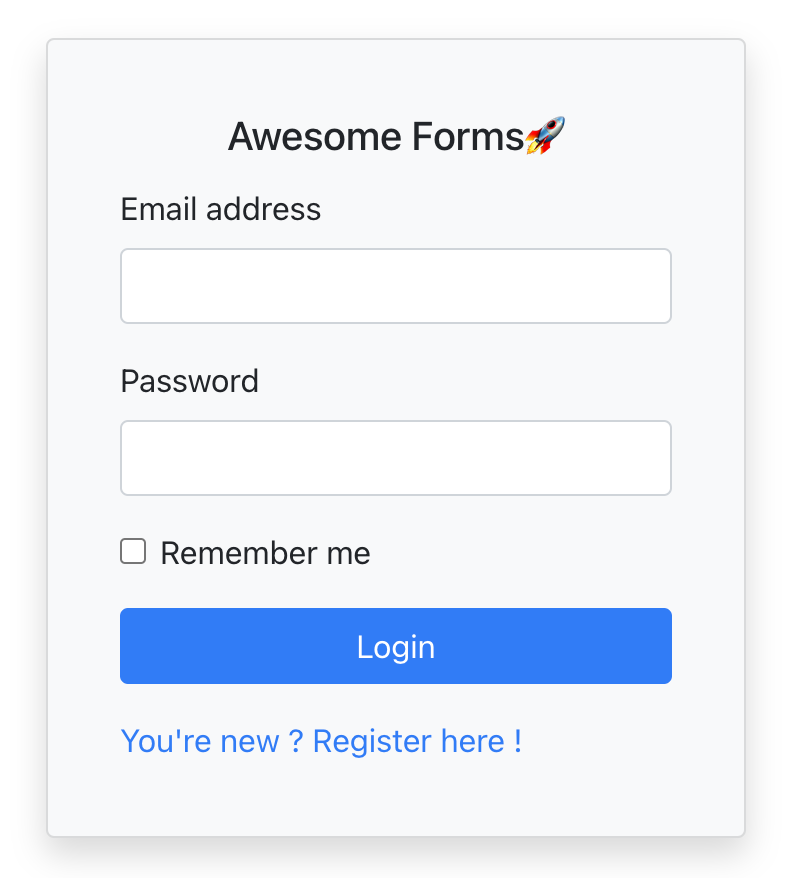
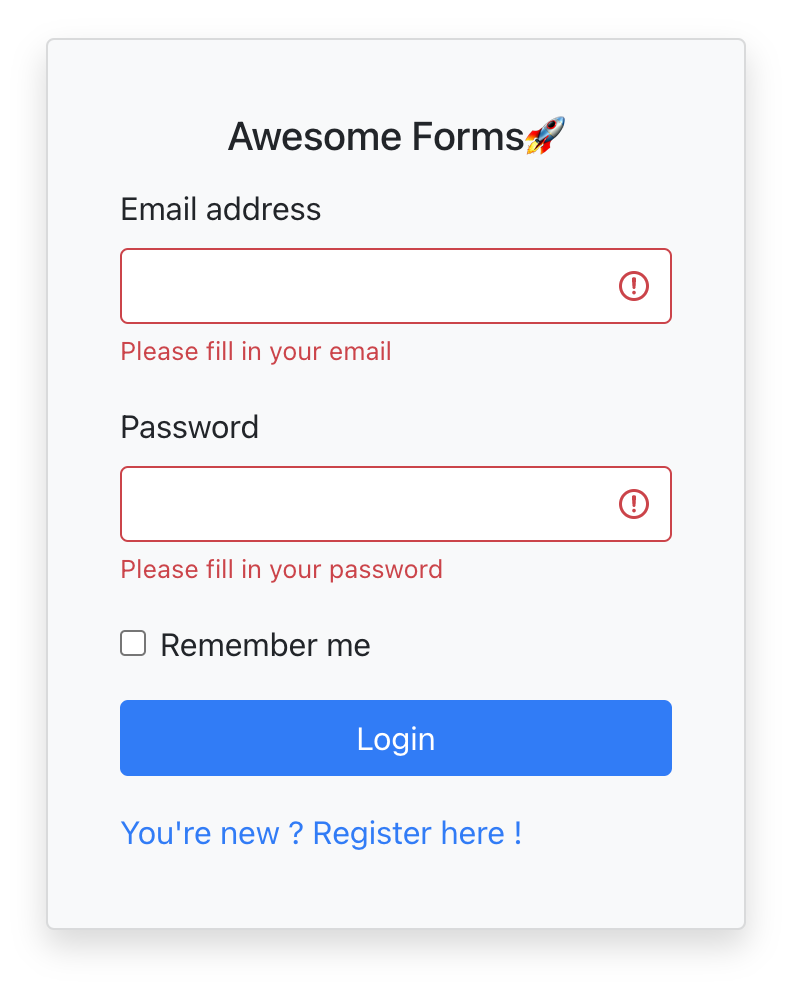
And here is what happens if we hit the login button without filling out the email nor the password:
First, we start by declaring the Yup schema:
const schema = yup.object().shape({
  email: yup
    .string()
    .email('This is not a valid email address')
    .required('Please fill in your email'),
  password: yup.string().required('Please fill in your password'),
  rememberMe: yup.boolean(),
})
Pretty simple, as you can see. It works by chaining validators for a specific field. For example, an email should be:
- a string:
.string() - also it should look like an email address:
.email() - and it is required:
.required()
You can specify an error message for each validation type, which is what I did, in order to provide accurate messages depending on the failure reason.
Once this is done, the next step is to type our form values:
// Type definition for the form data
type FormValues = {
  email: string
  password: string
  rememberMe: boolean
}
We will provide this type to react-hook-form, which will provide us a type-safe developer experience later when registering our inputs.
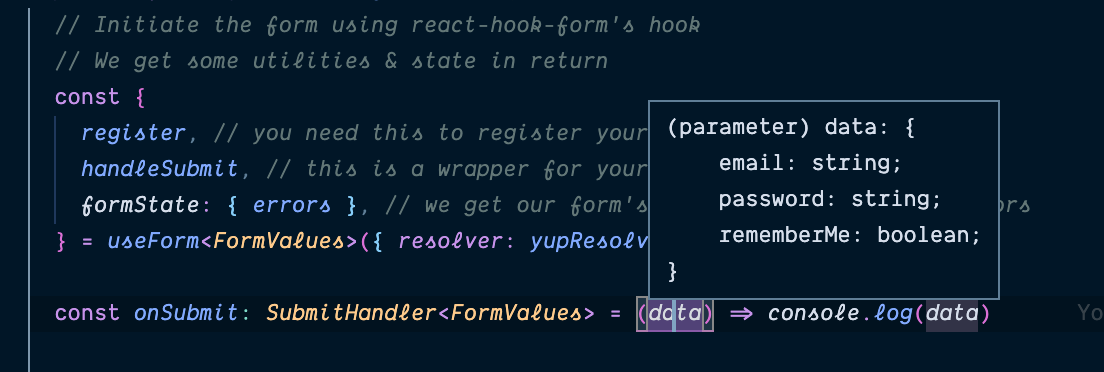
Speaking of react-hook-form, it's now time to start writing our login form component. We start by initializing the form using the useForm hook:
const {
  register,
  handleSubmit,
  formState: { errors },
} = useForm<FormValues>({ resolver: yupResolver(schema) })
As you can see, we destructure the return of useForm to get what we need. In our case, we only need a few things:
registerto register our inputs laterhandleSubmitto wrap our submit handler (so that react-hook-form can trigger form validation before calling it)formState: we can get many state values out of this, but here we only are interested in our form errors. If a validation error occurs for a specific field when submitting, the error message will be stored inerrors.email.messagefor example
We type useForm with our FormValues to tell react-hook-form about the structure of our form data, and finally, we specify one option, which is the resolver Yup. This is where it all comes together: react-hook-form will now use the yup validation schema we defined before to validate our form. For example, if the user types something that is not a valid email address in the email input and tries to submit the form, errors.email.message will be "Please fill in your email".
Let's write a simple submit handler which will just log the form data to the console:
const onSubmit: SubmitHandler<FormValues> = (data) => console.log(data)
Thanks to TypeScript, data is strongly typed so we don't make mistakes while accessing and manipulating it:
Now that everything is set up, let's render our form! As mentioned before, I'm using Bootstrap utility classes for styling purposes, just to demonstrate the fact that react-hook-form leaves the styling completely up to you. I won't explain what those classes do here, but you check their documentation if you're curious. Anyway, here is the final version of our Login form:
// LoginForm.tsx

import { SubmitHandler, useForm } from 'react-hook-form'
import { Link } from 'react-router-dom'
import * as yup from 'yup'
import { yupResolver } from '@hookform/resolvers/yup'
import cn from 'classnames'

// Yup validation schema
const schema = yup.object().shape({
  email: yup
    .string()
    .email('This is not a valid email address')
    .required('Please fill in your email'),
  password: yup.string().required('Please fill in your password'),
  rememberMe: yup.boolean(),
})

// Type definition for the form data
type FormValues = {
  email: string
  password: string
  rememberMe: boolean
}

/**
 * Simple Login Form Component
 */
export default function LoginForm() {
  // Initiate the form using react-hook-form's hook
  // We get some utilities & state in return
  const {
    register, // you need this to register your inputs
    handleSubmit, // this is a wrapper for your onSubmit handler
    formState: { errors }, // we get our form's state, especially the errors
  } = useForm<FormValues>({ resolver: yupResolver(schema) })

  const onSubmit: SubmitHandler<FormValues> = (data) => console.log(data)

  return (
    /**
     * A few things to note here:
     *  - the onSubmit callback needs to be wrapped with react-hook-form's
     *    handleSubmit utility
     *  - the "noValidate" prop on the form is here because we manage
     *    validation ourselves, with Yup, so we don't want the browser validation
     **/
    <form onSubmit={handleSubmit(onSubmit)} noValidate>
      {/** Email */}
      <div className="mb-3">
        <label htmlFor="email" className="form-label">
          Email address
        </label>
        <input
          id="email"
          type="email"
          className={cn('form-control', {
            /**
             * is-invalid is a Bootstrap utility class to highligh the
             * input in red in case of an error. If errors.email is not
             * nullish, it means there were a validation error regarding
             * this field
             */
            'is-invalid': Boolean(errors.email),
          })}
          {...register('email')}
        />
        {/** Render the error message related to this field (empty if no error) */}
        <div className="invalid-feedback">{errors.email?.message}</div>
      </div>

      {/** Password */}
      <div className="mb-3">
        <label htmlFor="password" className="form-label">
          Password
        </label>
        <input
          id="password"
          type="password"
          className={cn('form-control', {
            'is-invalid': Boolean(errors.password),
          })}
          {...register('password')}
        />
        <div className="invalid-feedback">{errors.password?.message}</div>
      </div>

      {/** Remember me */}
      <div className="mb-3 form-check">
        <input
          id="rememberMe"
          type="checkbox"
          className="form-check-input"
          {...register('rememberMe')}
        />
        <label className="form-check-label" htmlFor="rememberMe">
          Remember me
        </label>
      </div>

      {/** Submit button */}
      <button type="submit" className="btn btn-primary w-100 mb-3">
        Login
      </button>

      <Link to="/register">You're new ? Register here !</Link>
    </form>
  )
}
Here we go, pretty powerful, right? The entire validation process and the state management are being handled by react-hook-form and yup so we can focus on making a beautiful and accessible form.
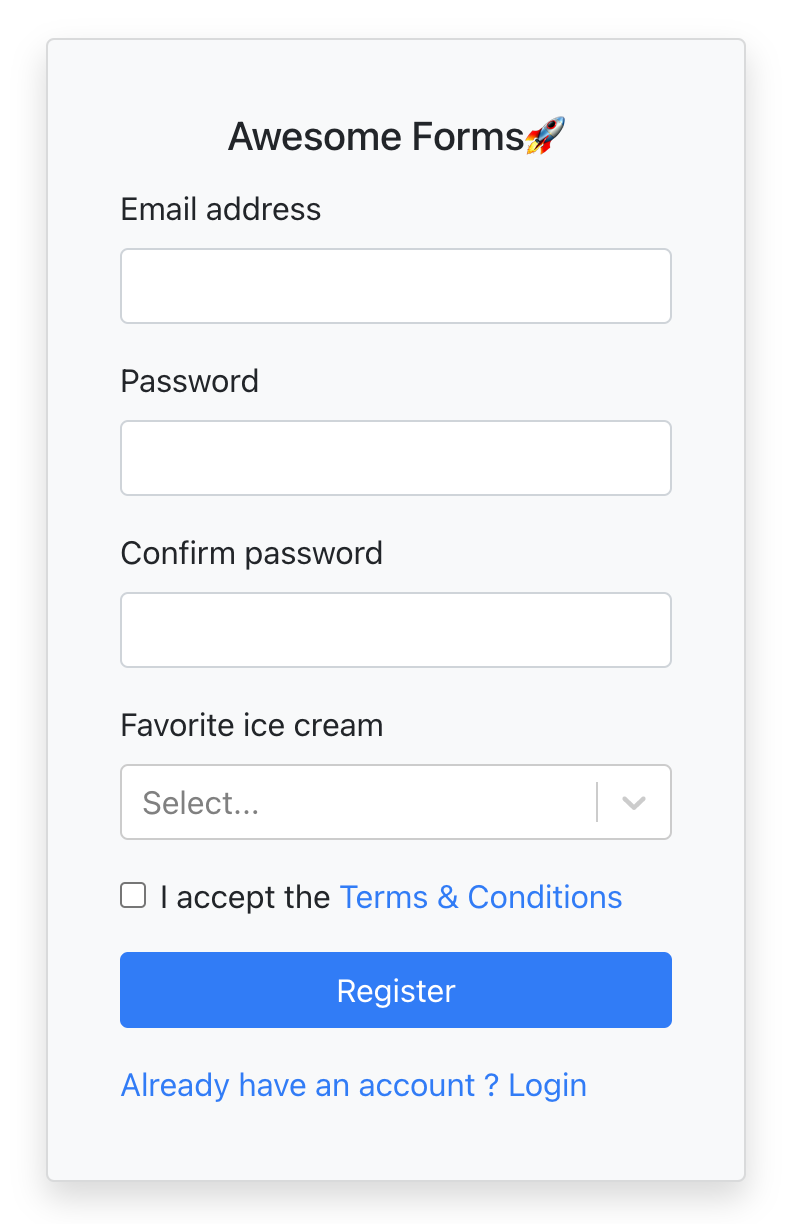
Earlier, I promised you a registration form, and I'm a man of my word, so here you go. Also, this allows me to demonstrate a few more things:
- A few more yup validation rules, like
oneOfwhich is used to easily validate that the "Confirm password" value is the same as "Password", or to make a boolean required (without this, the value "false" would pass the required rule, because it's not nullish) - The integration of a more complex UI component with
react-select: this is done using react-hook-form's Controller, which is amazingly simple. You provide it acontrolprop (retrieved from the hook) and arenderprop to render your custom component using the same benefits as withregister - The use of UI components instead of HTML markup, just to once again demonstrate that react-hook-form leaves the styling completely up to you
The form will look like this:

Here is the code:
// RegisterForm.tsx

import { useForm, Controller } from 'react-hook-form'
import { Link } from 'react-router-dom'
import Select, { OptionTypeBase } from 'react-select'
import * as yup from 'yup'
import { yupResolver } from '@hookform/resolvers/yup'

// For this one, we will use react-boostrap component instead of HTML markup
// for the form (because why not ? it's up to us 👌)
import Form from 'react-bootstrap/Form'
import Button from 'react-bootstrap/Button'

// Options for react-select
// We use this to ask the user about is favorite ice cream 🍦
const iceCreamOptions: OptionTypeBase[] = [
  { value: 'chocolate', label: 'Chocolate' },
  { value: 'strawberry', label: 'Strawberry' },
  { value: 'vanilla', label: 'Vanilla' },
]

// Yup validation schema
const schema = yup.object().shape({
  email: yup
    .string()
    .email('This is not a valid email address')
    .required('Please fill in your email'),
  password: yup.string().required('Please fill in your password'),
  passwordConfirm: yup
    .string()
        // Simple trick to validate that passwordConfirm is the same as passwor
    .oneOf([yup.ref('password')])
    .required('Passwords must match'),
  // favoriteIceCream isn't required, so we require its value to be one of the options, or null
  favoriteIceCream: yup.string().oneOf([...iceCreamOptions.map((option) => option.value), null]),
  acceptLegal: yup.boolean().oneOf([true], 'You must accept the Terms & Conditions'),
})

// Type definition for the form data
type FormValues = {
  email: string
  password: string
  passwordConfirm: string
  favoriteIceCream: OptionTypeBase
  acceptLegal: boolean
}

/**
 * Registration form
 */
export default function RegisterForm() {
  const {
    register,
    handleSubmit,
    formState: { errors },
    control,
  } = useForm<FormValues>({ resolver: yupResolver(schema) })

  function onSubmit(data: FormValues) {
        // When this is being executed, you know for sure that the form data is valid
        // according to the yup validation schema defined above
    const { passwordConfirm, acceptLegal, ...rest } = data
    console.log(rest) // you would only send what's in rest to your backend
  }

  return (
    <Form onSubmit={handleSubmit(onSubmit)} noValidate>
      {/** Email */}
      <Form.Group controlId="email" className="mb-3">
        <Form.Label>Email address</Form.Label>
        <Form.Control type="email" isInvalid={Boolean(errors.email)} {...register('email')} />
        <Form.Text className="invalid-feedback">{errors.email?.message}</Form.Text>
      </Form.Group>
      {/** Password */}
      <Form.Group controlId="password" className="mb-3">
        <Form.Label>Password</Form.Label>
        <Form.Control
          type="password"
          isInvalid={Boolean(errors.password)}
          {...register('password')}
        />
        <Form.Text className="invalid-feedback">{errors.password?.message}</Form.Text>
      </Form.Group>
      {/** Password Confirmation */}
      <Form.Group controlId="passwordConfirm" className="mb-3">
        <Form.Label>Confirm password</Form.Label>
        <Form.Control
          type="password"
          isInvalid={Boolean(errors.passwordConfirm)}
          {...register('passwordConfirm')}
        />
        <Form.Text className="invalid-feedback">{errors.passwordConfirm?.message}</Form.Text>
      </Form.Group>
      {/* Favorite Ice Cream */}
      <Form.Group controlId="favoriteIceCream" className="mb-3">
        <Form.Label>Favorite ice cream</Form.Label>
        <Controller
          name="favoriteIceCream" // equivalent to register('favoriteIceCream')
          control={control}
          render={({ field }) => <Select {...field} options={iceCreamOptions} />}
        />
      </Form.Group>
      {/** Accept terms & conditions */}
      <Form.Group controlId="acceptLegal" className="mb-3">
        <Form.Check
          type="checkbox"
          isInvalid={Boolean(errors.acceptLegal)}
          feedback={errors.acceptLegal?.message}
          label={
            <>
              I accept the <a href="#">Terms & Conditions</a>
            </>
          }
          {...register('acceptLegal')}
        />
      </Form.Group>

      {/** Submit button */}
      <Button variant="primary" type="submit" className="w-100 mb-3">
        Register
      </Button>
      <Link to="/">Already have an account ? Login</Link>
    </Form>
  )
}
Conclusion
I hope that you enjoyed this humble guide to building quality forms with React, using two wonderful libraries: react-hook-form and yup. This is what I use every time I need to build a form, and I feel really happy and confident about the process. The fact that I can focus on the UI, features, and accessibility without worrying too much about state management or validation myself is absolutely priceless, and it saves me a lot of time.
Check out the repository with all 4 forms (Controlled, Uncontrolled, Login and Register) with a fully functional user navigation using react-router, or open it in a code sandbox (read my post on CodeSandbox & Github Magic to learn more about this kind of magic links 🧙)
Feel free to let me know what your thoughts are on the subject in the comments, and share this post with your peers if you liked it!