

(Part 2) Build quality forms with React 🚀
Optimize developer experience, ship with confidence


Photo by Kelly Sikkema
This article is the second and final part of "Build quality forms with React 🚀". In the first part, I explained what controlled and uncontrolled forms are in React, and I introduced two wonderful libraries: react-hook-form and yup.
Putting it all together
To demonstrate how it all ties up together, I will walk you through the process of building a simple yet solid login form. It will be made of two inputs (email and password), a checkbox "remember me" to keep the user session alive, and a submit button. We will also add a link at the bottom of the form, to switch to the registration form that I will also show you later.
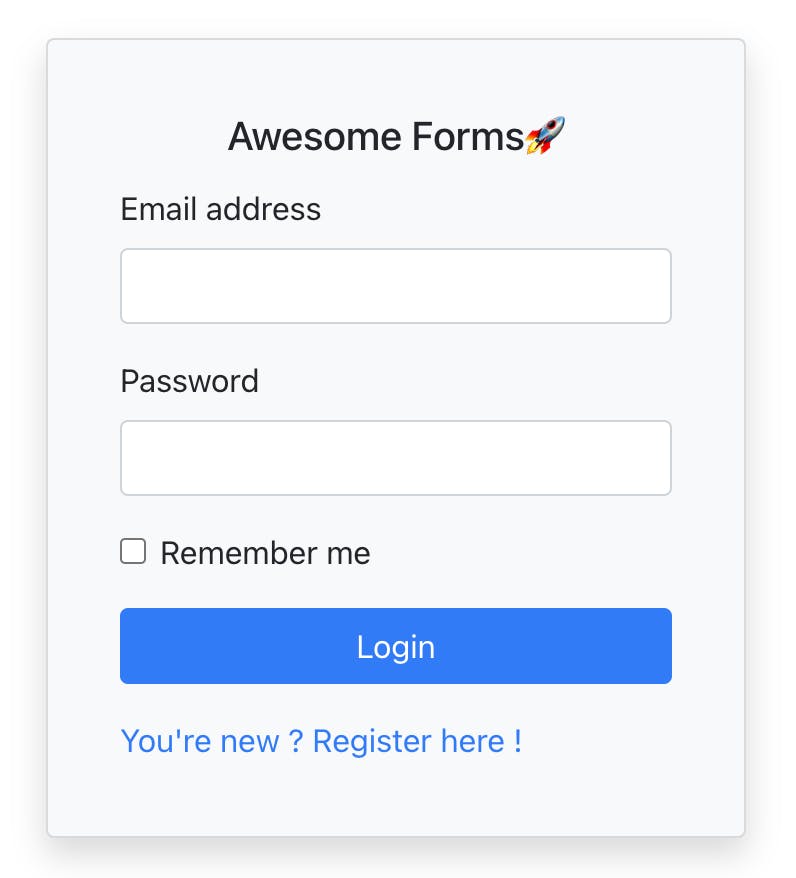
We won't be implementing any real authentication, the goal here is to focus only on the form and its validation. However, I will use Bootstrap class utilities for styling, so you get a good idea of what a "real-life" form would look like code-wise. Here is what the form will look like:
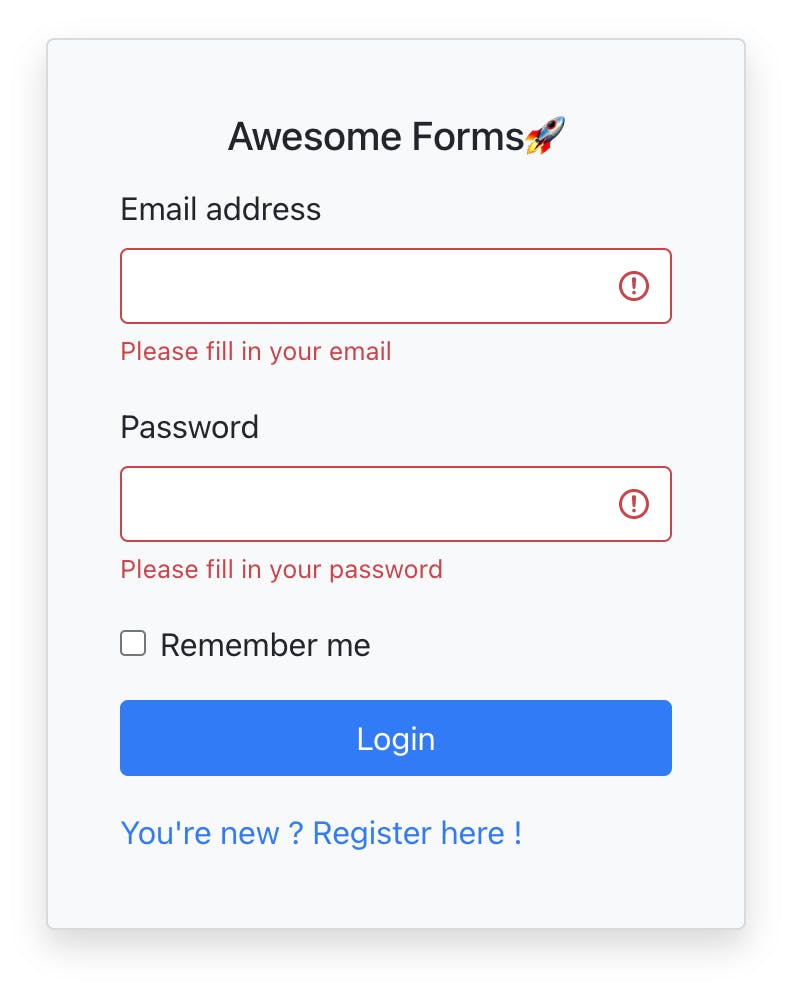
And here is what happens if we hit the login button without filling out the email nor the password:
First, we start by declaring the Yup schema:
const schema = yup.object().shape({
  email: yup
    .string()
    .email('This is not a valid email address')
    .required('Please fill in your email'),
  password: yup.string().required('Please fill in your password'),
  rememberMe: yup.boolean(),
})
Pretty simple, as you can see. It works by chaining validators for a specific field. For example, an email should be:
- a string:
.string() - also it should look like an email address:
.email() - and it is required:
.required()
You can specify an error message for each validation type, which is what I did, in order to provide accurate messages depending on the failure reason.
Once this is done, the next step is to type our form values:
// Type definition for the form data
type FormValues = {
  email: string
  password: string
  rememberMe: boolean
}
We will provide this type to react-hook-form, which will provide us a type-safe developer experience later when registering our inputs.
Speaking of react-hook-form, it's now time to start writing our login form component. We start by initializing the form using the useForm hook:
const {
  register,
  handleSubmit,
  formState: { errors },
} = useForm<FormValues>({ resolver: yupResolver(schema) })
As you can see, we destructure the return of useForm to get what we need. In our case, we only need a few things:
registerto register our inputs laterhandleSubmitto wrap our submit handler (so that react-hook-form can trigger form validation before calling it)formState: we can get many state values out of this, but here we only are interested in our form errors. If a validation error occurs for a specific field when submitting, the error message will be stored inerrors.email.messagefor example
We type useForm with our FormValues to tell react-hook-form about the structure of our form data, and finally, we specify one option, which is the resolver Yup. This is where it all comes together: react-hook-form will now use the yup validation schema we defined before to validate our form. For example, if the user types something that is not a valid email address in the email input and tries to submit the form, errors.email.message will be "Please fill in your email".
Let's write a simple submit handler which will just log the form data to the console:
const onSubmit: SubmitHandler<FormValues> = (data) => console.log(data)
Thanks to TypeScript, data is strongly typed so we don't make mistakes while accessing and manipulating it:

Now that everything is set up, let's render our form! As mentioned before, I'm using Bootstrap utility classes for styling purposes, just to demonstrate the fact that react-hook-form leaves the styling completely up to you. I won't explain what those classes do here, but you check their documentation if you're curious. Anyway, here is the final version of our Login form:
// LoginForm.tsx

import { SubmitHandler, useForm } from 'react-hook-form'
import { Link } from 'react-router-dom'
import * as yup from 'yup'
import { yupResolver } from '@hookform/resolvers/yup'
import cn from 'classnames'

// Yup validation schema
const schema = yup.object().shape({
  email: yup
    .string()
    .email('This is not a valid email address')
    .required('Please fill in your email'),
  password: yup.string().required('Please fill in your password'),
  rememberMe: yup.boolean(),
})

// Type definition for the form data
type FormValues = {
  email: string
  password: string
  rememberMe: boolean
}

/**
 * Simple Login Form Component
 */
export default function LoginForm() {
  // Initiate the form using react-hook-form's hook
  // We get some utilities & state in return
  const {
    register, // you need this to register your inputs
    handleSubmit, // this is a wrapper for your onSubmit handler
    formState: { errors }, // we get our form's state, especially the errors
  } = useForm<FormValues>({ resolver: yupResolver(schema) })

  const onSubmit: SubmitHandler<FormValues> = (data) => console.log(data)

  return (
    /**
     * A few things to note here:
     *  - the onSubmit callback needs to be wrapped with react-hook-form's
     *    handleSubmit utility
     *  - the "noValidate" prop on the form is here because we manage
     *    validation ourselves, with Yup, so we don't want the browser validation
     **/
    <form onSubmit={handleSubmit(onSubmit)} noValidate>
      {/** Email */}
      <div className="mb-3">
        <label htmlFor="email" className="form-label">
          Email address
        </label>
        <input
          id="email"
          type="email"
          className={cn('form-control', {
            /**
             * is-invalid is a Bootstrap utility class to highligh the
             * input in red in case of an error. If errors.email is not
             * nullish, it means there were a validation error regarding
             * this field
             */
            'is-invalid': Boolean(errors.email),
          })}
          {...register('email')}
        />
        {/** Render the error message related to this field (empty if no error) */}
        <div className="invalid-feedback">{errors.email?.message}</div>
      </div>

      {/** Password */}
      <div className="mb-3">
        <label htmlFor="password" className="form-label">
          Password
        </label>
        <input
          id="password"
          type="password"
          className={cn('form-control', {
            'is-invalid': Boolean(errors.password),
          })}
          {...register('password')}
        />
        <div className="invalid-feedback">{errors.password?.message}</div>
      </div>

      {/** Remember me */}
      <div className="mb-3 form-check">
        <input
          id="rememberMe"
          type="checkbox"
          className="form-check-input"
          {...register('rememberMe')}
        />
        <label className="form-check-label" htmlFor="rememberMe">
          Remember me
        </label>
      </div>

      {/** Submit button */}
      <button type="submit" className="btn btn-primary w-100 mb-3">
        Login
      </button>

      <Link to="/register">You're new ? Register here !</Link>
    </form>
  )
}
Here we go, pretty powerful, right? The entire validation process and the state management are being handled by react-hook-form and yup so we can focus on making a beautiful and accessible form.
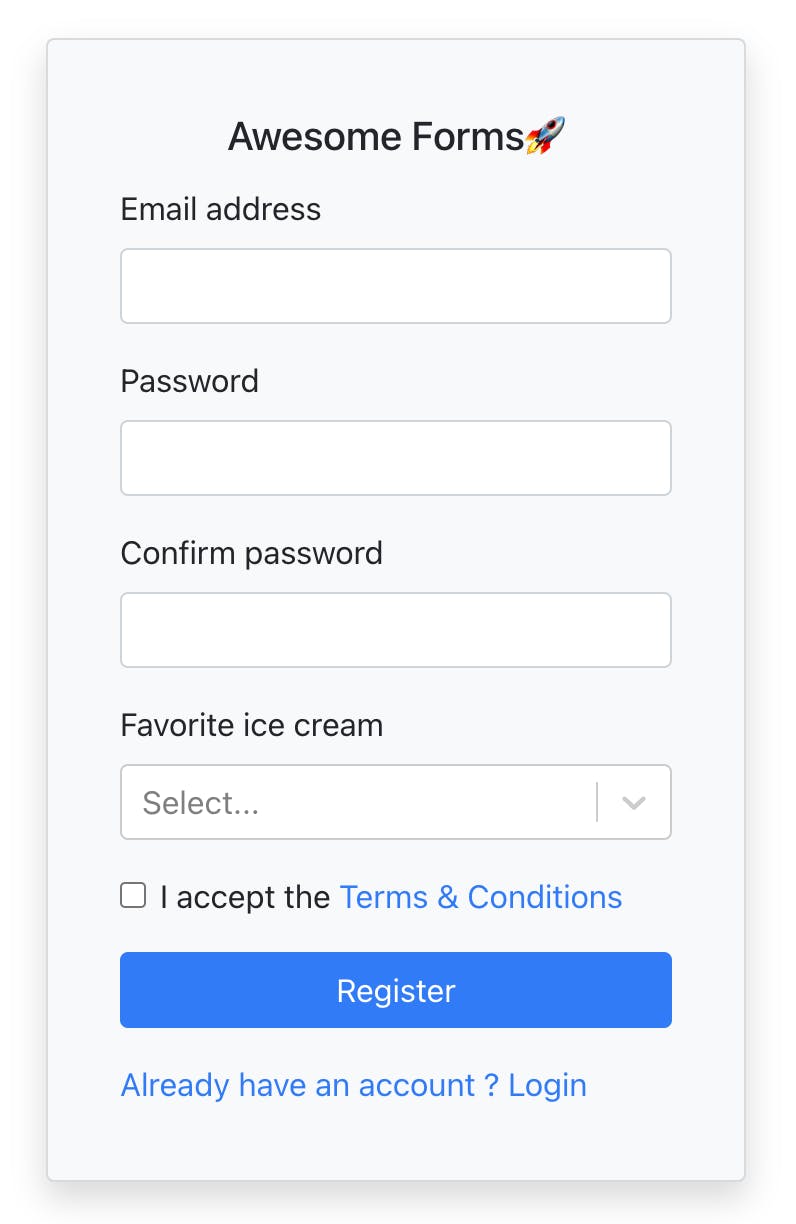
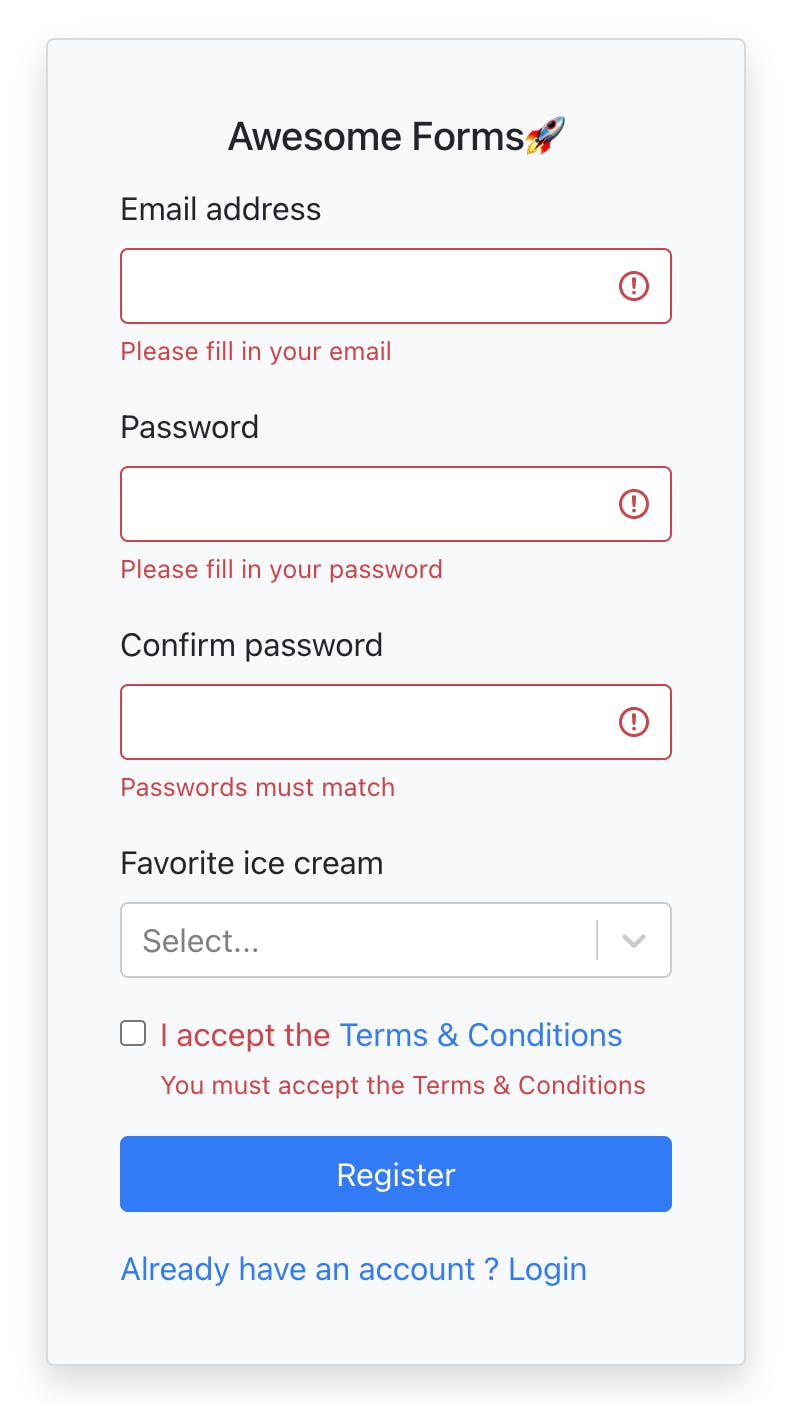
Earlier, I promised you a registration form, and I'm a man of my word, so here you go. Also, this allows me to demonstrate a few more things:
- A few more yup validation rules, like
oneOfwhich is used to easily validate that the "Confirm password" value is the same as "Password", or to make a boolean required (without this, the value "false" would pass the required rule, because it's not nullish) - The integration of a more complex UI component with
react-select: this is done using react-hook-form's Controller, which is amazingly simple. You provide it acontrolprop (retrieved from the hook) and arenderprop to render your custom component using the same benefits as withregister - The use of UI components instead of HTML markup, just to once again demonstrate that react-hook-form leaves the styling completely up to you
The form will look like this:
Here is the code:
// RegisterForm.tsx

import { useForm, Controller } from 'react-hook-form'
import { Link } from 'react-router-dom'
import Select, { OptionTypeBase } from 'react-select'
import * as yup from 'yup'
import { yupResolver } from '@hookform/resolvers/yup'

// For this one, we will use react-boostrap component instead of HTML markup
// for the form (because why not ? it's up to us 👌)
import Form from 'react-bootstrap/Form'
import Button from 'react-bootstrap/Button'

// Options for react-select
// We use this to ask the user about is favorite ice cream 🍦
const iceCreamOptions: OptionTypeBase[] = [
  { value: 'chocolate', label: 'Chocolate' },
  { value: 'strawberry', label: 'Strawberry' },
  { value: 'vanilla', label: 'Vanilla' },
]

// Yup validation schema
const schema = yup.object().shape({
  email: yup
    .string()
    .email('This is not a valid email address')
    .required('Please fill in your email'),
  password: yup.string().required('Please fill in your password'),
  passwordConfirm: yup
    .string()
        // Simple trick to validate that passwordConfirm is the same as passwor
    .oneOf([yup.ref('password')])
    .required('Passwords must match'),
  // favoriteIceCream isn't required, so we require its value to be one of the options, or null
  favoriteIceCream: yup.string().oneOf([...iceCreamOptions.map((option) => option.value), null]),
  acceptLegal: yup.boolean().oneOf([true], 'You must accept the Terms & Conditions'),
})

// Type definition for the form data
type FormValues = {
  email: string
  password: string
  passwordConfirm: string
  favoriteIceCream: OptionTypeBase
  acceptLegal: boolean
}

/**
 * Registration form
 */
export default function RegisterForm() {
  const {
    register,
    handleSubmit,
    formState: { errors },
    control,
  } = useForm<FormValues>({ resolver: yupResolver(schema) })

  function onSubmit(data: FormValues) {
        // When this is being executed, you know for sure that the form data is valid
        // according to the yup validation schema defined above
    const { passwordConfirm, acceptLegal, ...rest } = data
    console.log(rest) // you would only send what's in rest to your backend
  }

  return (
    <Form onSubmit={handleSubmit(onSubmit)} noValidate>
      {/** Email */}
      <Form.Group controlId="email" className="mb-3">
        <Form.Label>Email address</Form.Label>
        <Form.Control type="email" isInvalid={Boolean(errors.email)} {...register('email')} />
        <Form.Text className="invalid-feedback">{errors.email?.message}</Form.Text>
      </Form.Group>
      {/** Password */}
      <Form.Group controlId="password" className="mb-3">
        <Form.Label>Password</Form.Label>
        <Form.Control
          type="password"
          isInvalid={Boolean(errors.password)}
          {...register('password')}
        />
        <Form.Text className="invalid-feedback">{errors.password?.message}</Form.Text>
      </Form.Group>
      {/** Password Confirmation */}
      <Form.Group controlId="passwordConfirm" className="mb-3">
        <Form.Label>Confirm password</Form.Label>
        <Form.Control
          type="password"
          isInvalid={Boolean(errors.passwordConfirm)}
          {...register('passwordConfirm')}
        />
        <Form.Text className="invalid-feedback">{errors.passwordConfirm?.message}</Form.Text>
      </Form.Group>
      {/* Favorite Ice Cream */}
      <Form.Group controlId="favoriteIceCream" className="mb-3">
        <Form.Label>Favorite ice cream</Form.Label>
        <Controller
          name="favoriteIceCream" // equivalent to register('favoriteIceCream')
          control={control}
          render={({ field }) => <Select {...field} options={iceCreamOptions} />}
        />
      </Form.Group>
      {/** Accept terms & conditions */}
      <Form.Group controlId="acceptLegal" className="mb-3">
        <Form.Check
          type="checkbox"
          isInvalid={Boolean(errors.acceptLegal)}
          feedback={errors.acceptLegal?.message}
          label={
            <>
              I accept the <a href="#">Terms & Conditions</a>
            </>
          }
          {...register('acceptLegal')}
        />
      </Form.Group>

      {/** Submit button */}
      <Button variant="primary" type="submit" className="w-100 mb-3">
        Register
      </Button>
      <Link to="/">Already have an account ? Login</Link>
    </Form>
  )
}
Conclusion
I hope that you enjoyed this humble guide to building quality forms with React, using two wonderful libraries: react-hook-form and yup. This is what I use every time I need to build a form, and I feel really happy and confident about the process. The fact that I can focus on the UI, features, and accessibility without worrying too much about state management or validation myself is absolutely priceless, and it saves me a lot of time.
Check out the repository with all 4 forms (Controlled, Uncontrolled, Login and Register) with a fully functional user navigation using react-router, or open it in a code sandbox (read my post on CodeSandbox & Github Magic to learn more about this kind of magic links 🧙)
Feel free to let me know what your thoughts are on the subject in the comments, and share this post with your peers if you liked it!